In October, at the partner conference of Arusnavi, we announced a new module "Routes". During the last two months, we have implemented all your wishes and suggestions. And now, the new module "Routes" is officially available in Gelios monitoring system. We tried to make the new functionality as universal as possible. Many of the users will certainly find application for the routes not only in passenger transportation, but also in other industries.
So, how it works and what to expect in near future we will tell in this article.

Although
earlier it was said that "Routes" is just a module, but, in fact, it
is a full-fledged route management system, which main tasks are real-time
planning and monitoring of routes, distribution of vehicles on rides and
scheduling management.
So, how the
"Routes" works in the Gelios Tracking System.
Route planning is a simple process. Some users may find this process even fascinating.
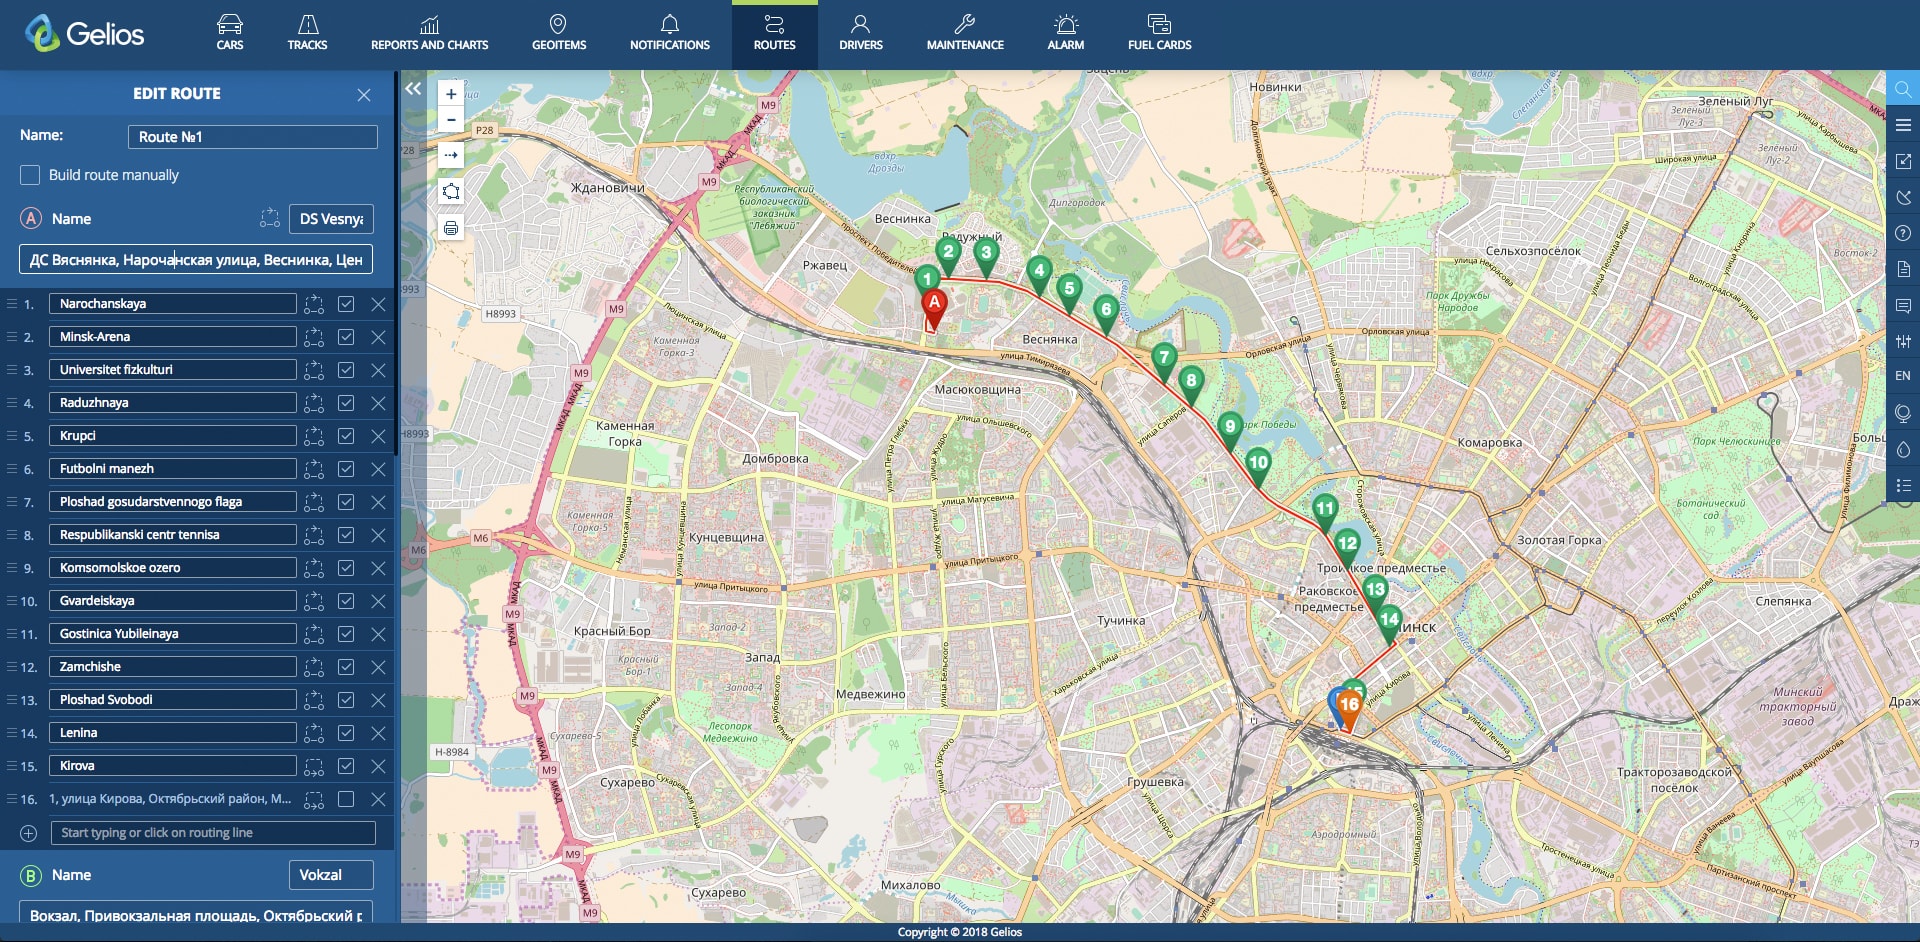
To create a
route, specify the start and end points on the map by entering the address in
the appropriate fields, or specify points with one click on the map. The route
will be automatically built. In order to rebuild the route, you should specify
a checkpoint through which the route must pass. The route will be automatically
rebuilt. The user can use checkpoints as stops by clicking the appropriate
check mark and specifying the name for the stop.
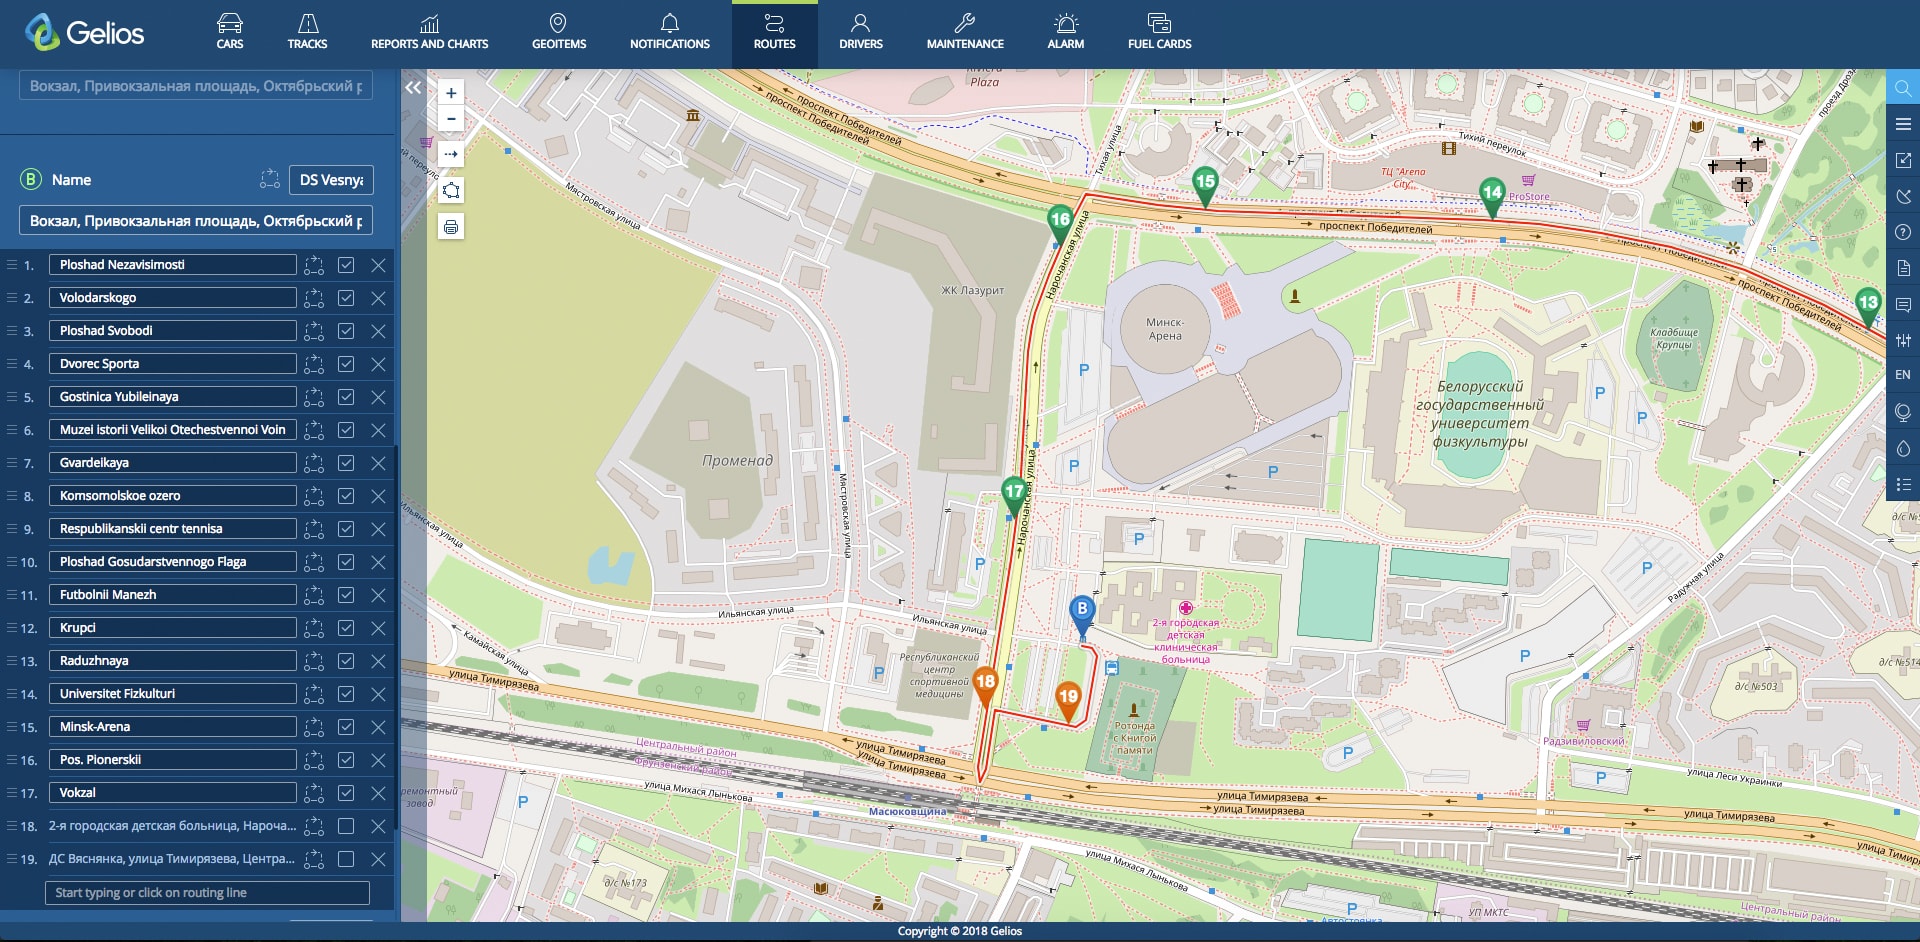
Click "Build Return Route" and the route will be rebuilt, however, if you used checkpoints or stops, return route will be built incorrectly. To display the route correctly, you should transfer checkpoints and stops to the opposite side of the road. Of course, you may plan return route without any stops, or even plan more stops. This situation is also envisaged. User can delete unnecessary stops, leaving only checkpoints, or add the necessary stops.
We couldn't disregard the specifics of the area. Therefore, in areas where automatic routing is impossible, the possibility of manual routing comes to help you by specifying checkpoints without linking to roads. If there are no roads in an area, then the whole route can be built manually, by putting an appropriate checkmark at the beginning of the route planning.
The route is built. Let's go further.
First of all, after route building, you need to create movement templates along the route. Depending on the day of the week, time of day and traffic density, vehicle may move along a route with a different time interval between stops, which also affects the duration of the ride. A template is created for each such condition.
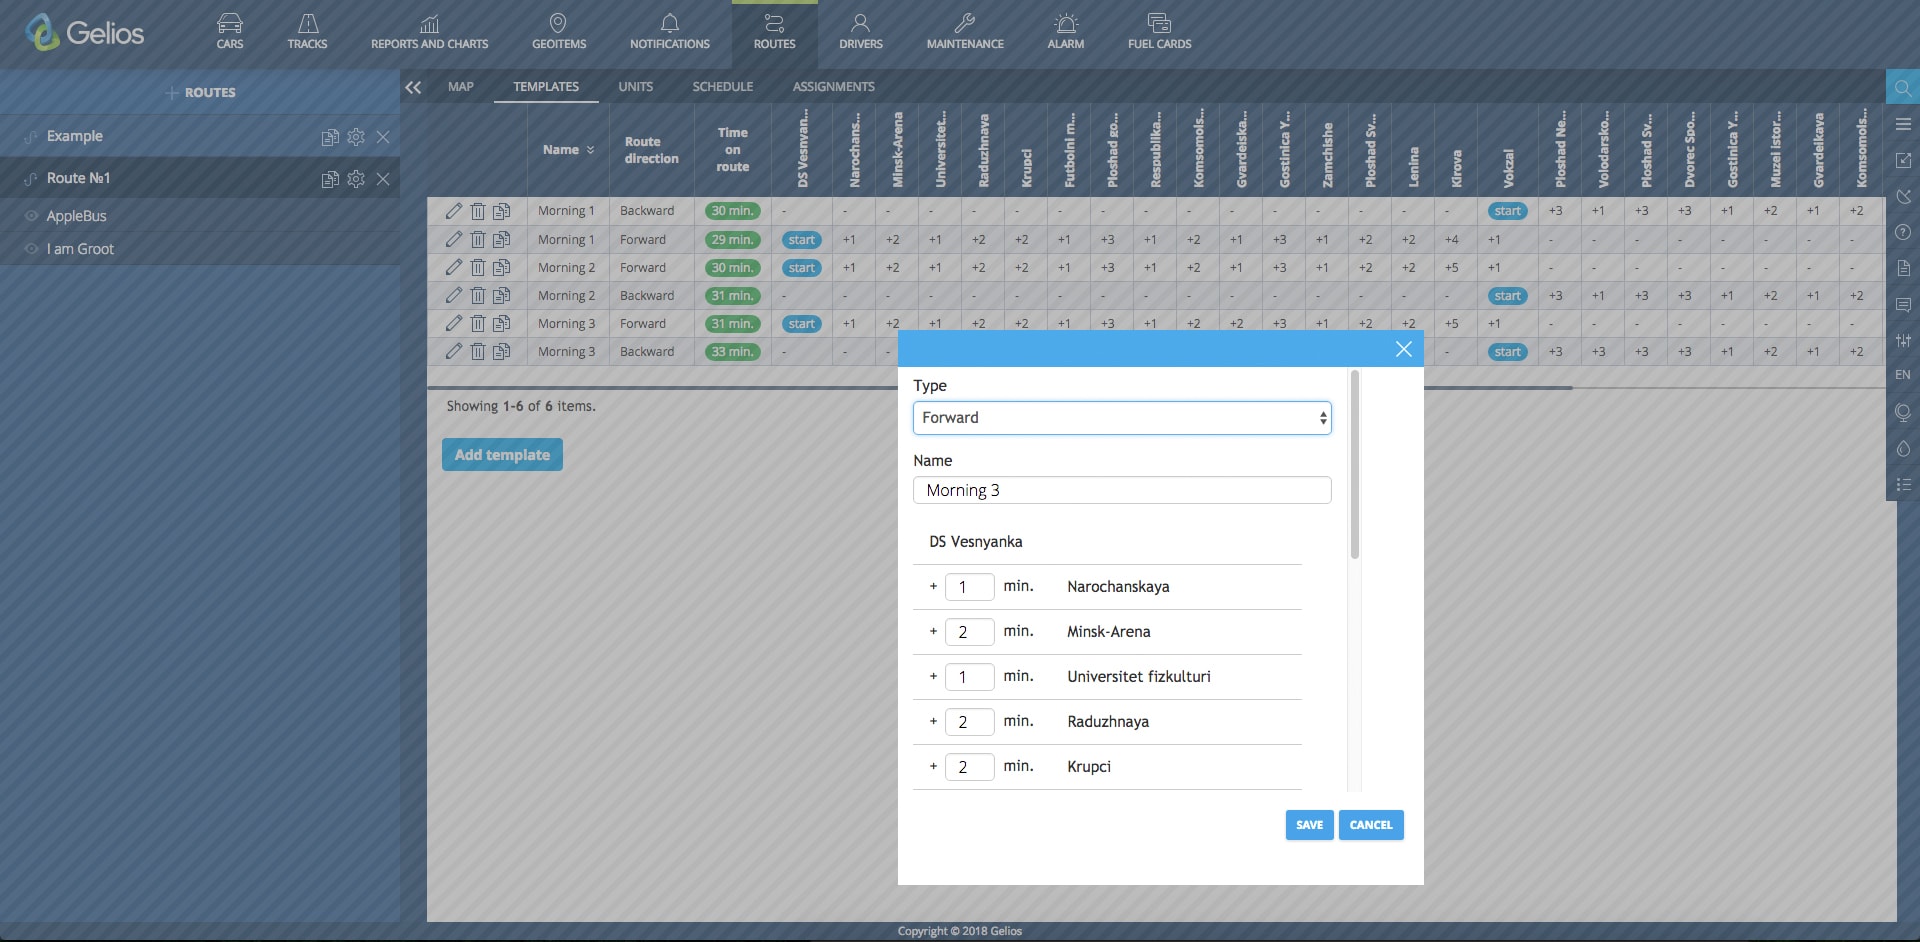
There are 3 types of templates:
Time intervals are set by adding the number of minutes from the previous stop to the current one. I.e. time required to overcome the distance between stops.
In the end,
we get a list of templates with time intervals for each stop and the duration
of the ride (the system automatically sums the time intervals).
Templates
can be edited, deleted and copied. Copying a template will greatly speed up the
work if intervals change only for a few stops.
In the "Units" tab, it is possible to assign units on route and to remove units from the route. The tab is a list of the units of the account with vehicle brand and number plate, as well as indicating groups to which the unit belongs.
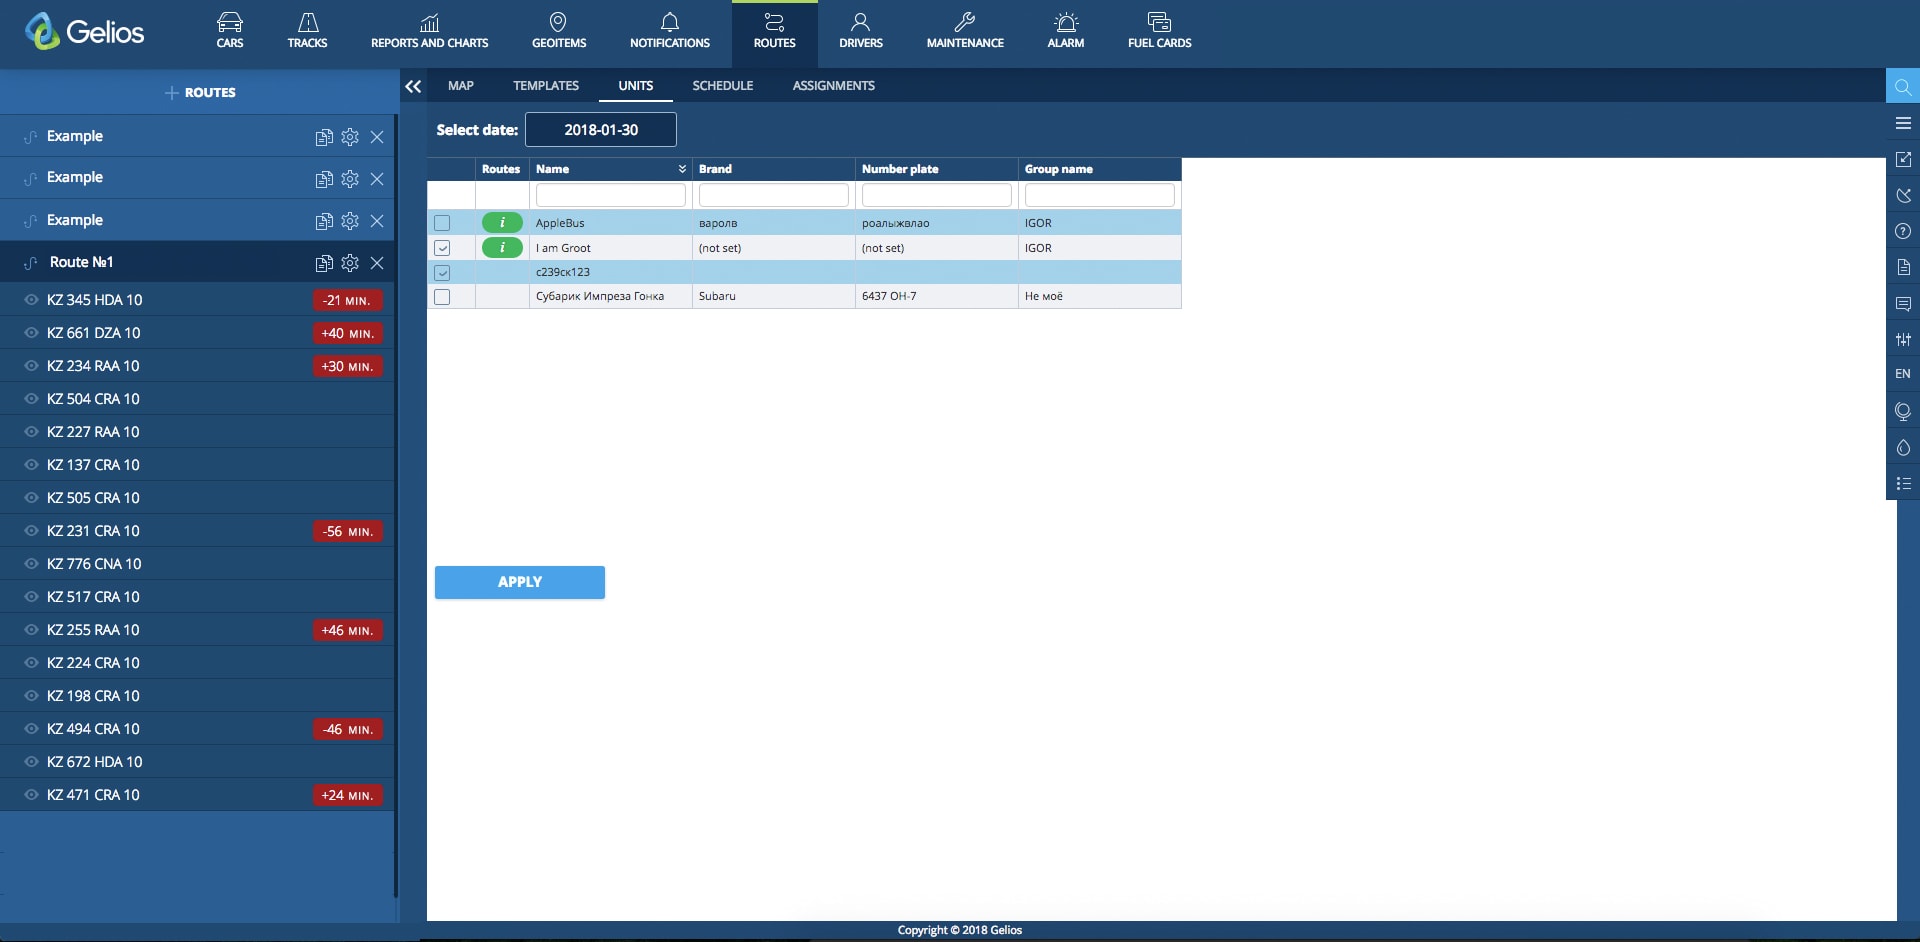
To assign / remove unit from the route, you need to:
If unit has already been assigned to this route for that date, then the tick opposite to it will already be standing. If you remove a tick you will remove unit from route.
Also, there
is an information icon opposite each unit, when clicked on, the user will be
able to find out on what other routes this unit is assigned to.
So, template was created, units were assigned on the route. Let's move on to the schedule.
A schedule is a set of vehicle departures to a route, each of which has a certain number of rides that are specific to a particular day of the week.
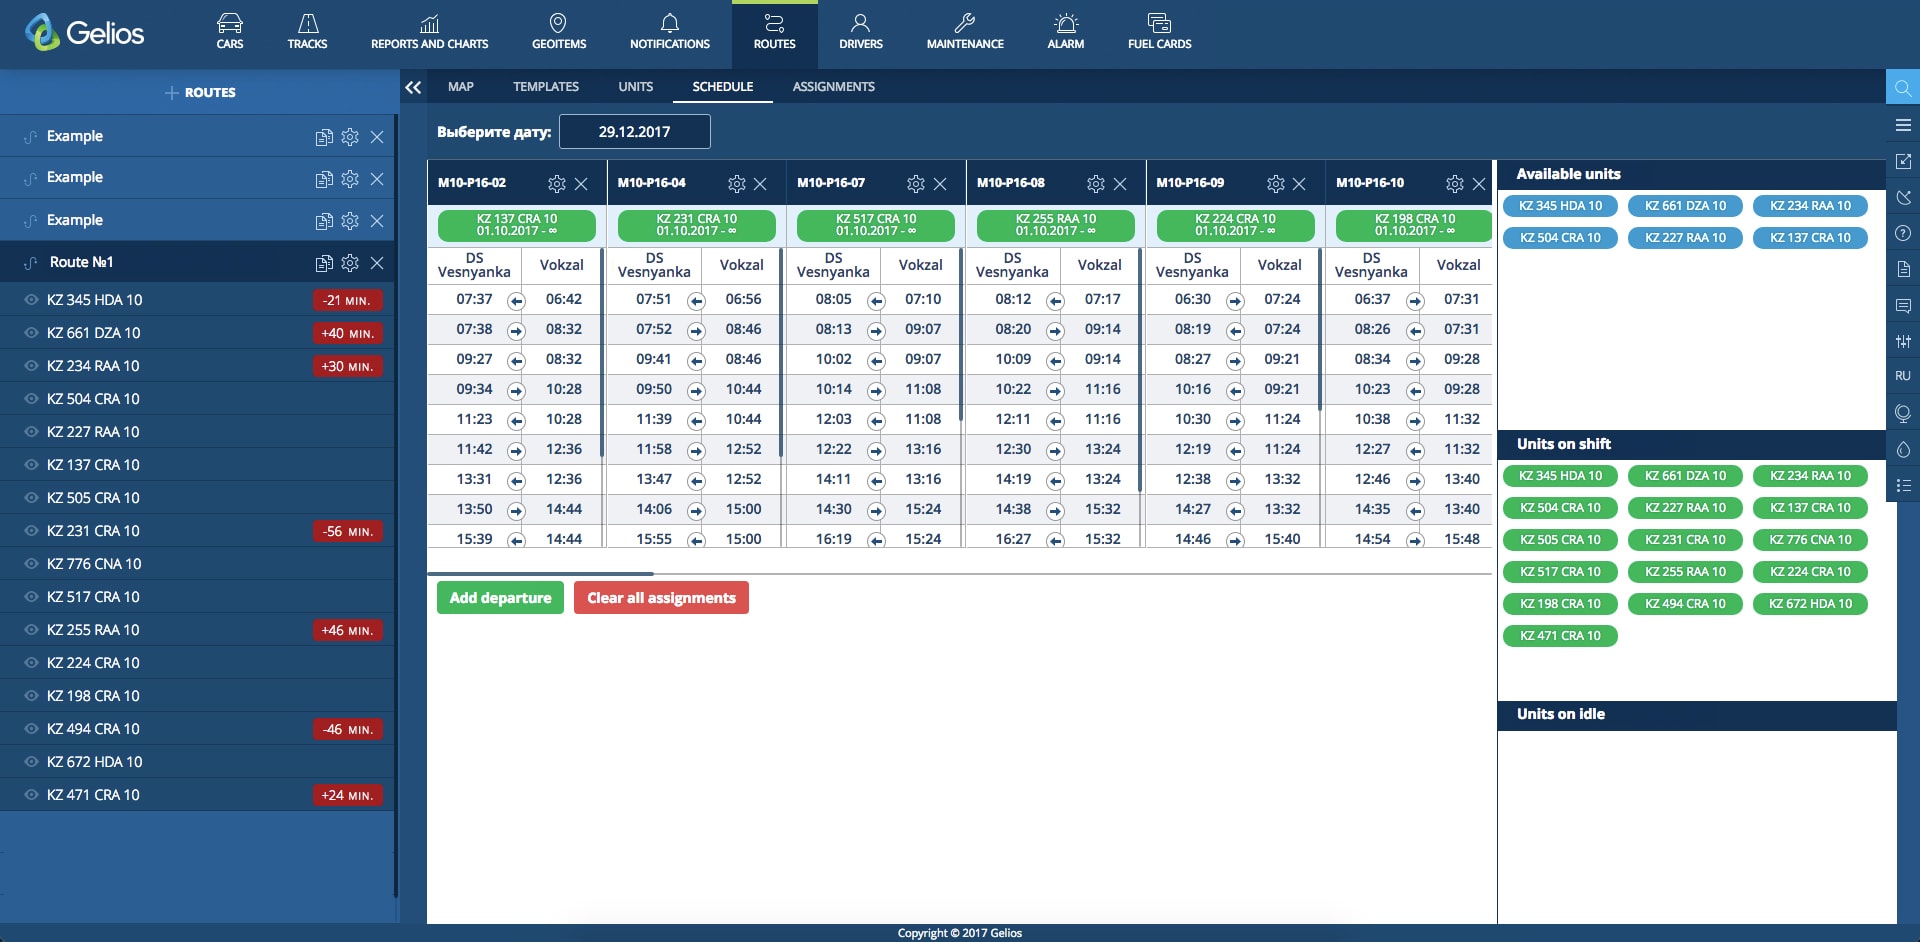
So, for
example, there are 3 (three) vehicles on the route on weekdays , and 2 (two)
vehicles on the day off. Accordingly, the quantity of departures to the route
will be 5 (five). Let's consider this question step by step.
To add a departure, you must specify its name, active dates, and specify days of the week. Active dates are the period for which the given departure is relevant. So, for example, if we create a departure with active dates from the beginning of September to the end of November, then in December the schedule of this departure will no longer be.
After saving the departure, user will be able to add all the rides characteristic for this departure, indicating the necessary movement template along the route and the time of the beginning of movement. If necessary, rides can be edited or deleted.
As a result
of the work done, we get a schedule with departures and rides on them, as well
as with available units for this route, which can already be assigned to the
departure.
The assignment of unit to the departure is carried out by "dragging" the unit from the list of available units to the desired departure. Note that the date in the schedule is the date of the assignment of unit to the departure. By dragging an unit to the departure, user will only have to enter a description of the assignment, if necessary, and specify the end date of the assignment. If the assignment is successful, the unit will be displayed in the list of assigned units.
The system
will not allow unit to be assigned to the departure if another unit has already
been assigned to this period, or the unit has already been assigned to another
departure.
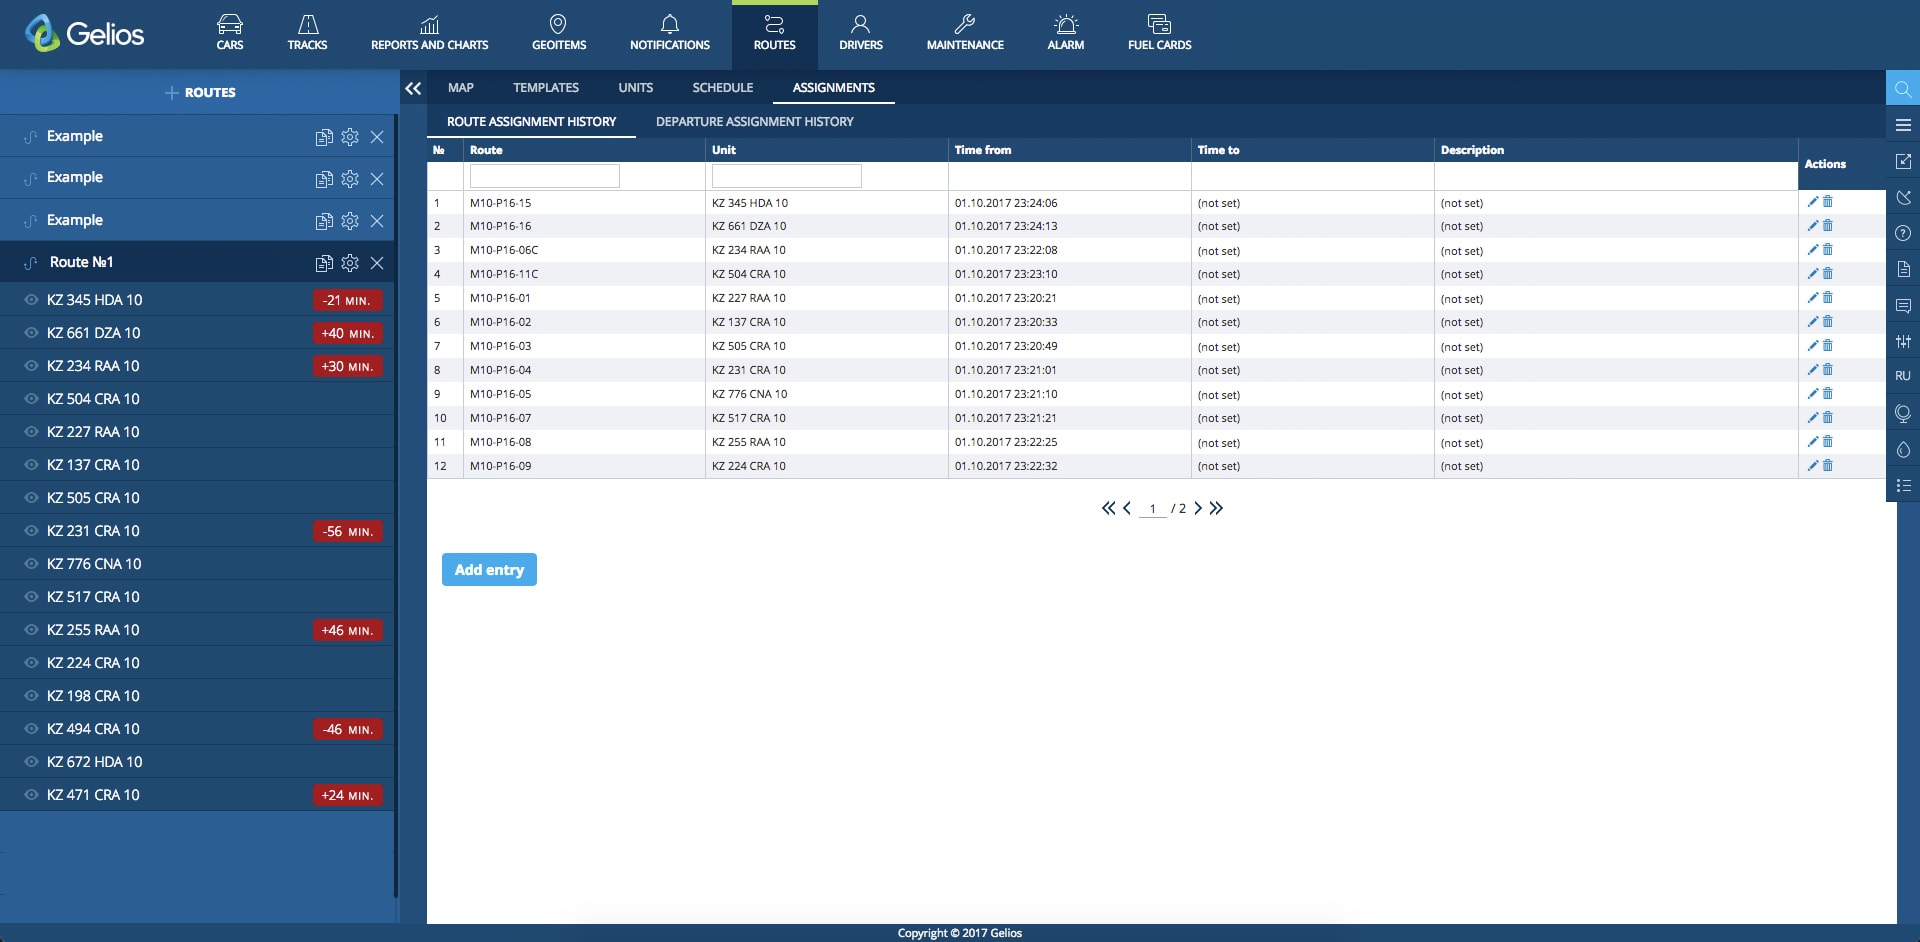
The assignments log is divided into: assignments of units to the route and assignments of units to the departures. Log entries are created automatically when assignments are made. However, the log provides the addition, editing and deleting of records, which is directly reflected in the schedule. Convenient filter allows fast tracking of assignments and fill possible gaps in the schedule.
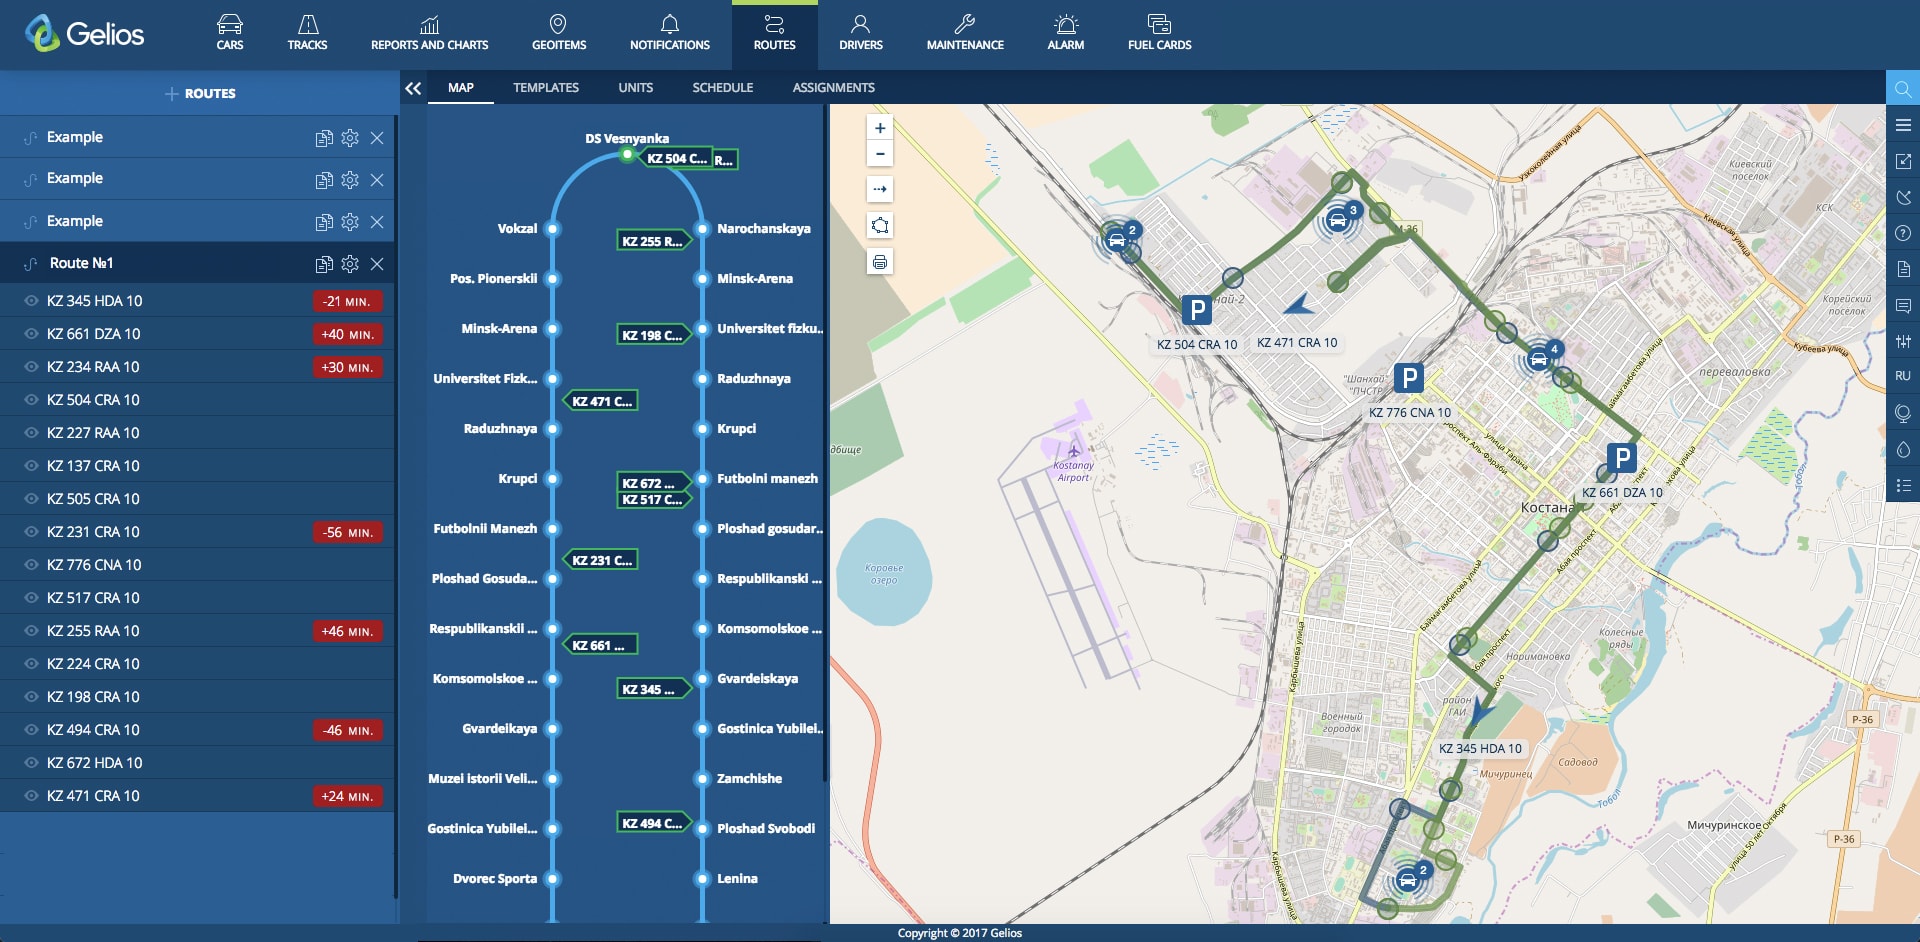
After successful completing of all the above actions, you can return to the "Map" tab. Here the user is given the opportunity to track movement of units along the route online in 2 types: on the map and on the scheme. Time of lagging or advancing vehicle to the next stop will be displayed opposite each unit.
In order to obtain analytics along the routes, the following types of reports are available in Gelios Tracking System:
Analysis of report data allows optimizing work of vehicles on the route.
In nearest future we are planning to add notifications with the following conditions:
Follow for our latest news on social networks.
 info@geliossoft.com